First, let me start by saying I am in no way advocating to ditch Apple. Anyone that knows me will tell you that I am one of the biggest Apple fans ever. I own every device they have ever made with the exception of the new Mac Pro—we will get to that in a minute. I have used Macs exclusively since the days of the Macintosh SE. My daily driver is the MacBook Pro 16” which is a very stout and ideal machine for email, web and photo editing. I even own Apple stock. Mac people: as you read this, do not be mad at me. It is what it is and I did not want to believe it either.
In contrast, and formerly in harmony with Apple, I always advocate using the best tool for the job. Anyone that has been on one of my commercial productions will tell you that we do not always use what everyone else is using in terms of equipment. We use whatever we feel is the best tool to get the job done.
It used to be that the Mac OS was light years ahead of Windows in terms of intuition, ease of use and reliability. Back in the 1990s, I could not even figure out how to print a Microsoft Word document on a Microsoft Windows machine. The old Mac vs. PC commercials were so dead-on correct (and pretty funny) back in the early 2000s.
Flash forward to the present day and you will find that Windows 10 is a very useable operating system. Albeit different than the Mac OS, it is very easy to navigate and use. A comparison would be using the dash and touch screen system in a BMW versus a Mercedes—both are different but easy to figure out even if you are used to one versus the other.
Flash forward again to the present day and I can tell you first hand that the Mac OS has become so bloated with unnecessary features that they actually degrade the experience instead of enhance. Can you imagine how fast the Mac environment would be if all the bloatware was stripped away or if you could at least turn it off like in the days of OS9? Functions and operations have changed and, for all I can tell, just for the sake of being changed. Many functions are no longer intuitive. I find myself Googling just how to change simple preferences on the Mac because I can no longer find those preferences. Try to turn off Wi-Fi Calling on your Mac without Googling it. Go ahead—I will wait. See. And, lastly, in the ecosystem department, apps that we all love and use everyday to edit our videos and photos like Adobe Photoshop and Premiere, are identical in Windows as you see them on a Mac. Once you have Photoshop open, you cannot tell if you are on a Mac or Windows machine. The same with Capture One and just about any other app.
My point with the last two paragraphs is the Mac OS is no longer an advantage over Windows. In my mind, it is an even playing field and that is what started me down this path of even looking at a Windows workstation. Going back to my point of using the best tool for the job—the Mac may no longer be the best tool especially when you see the next two paragraphs. And before we dive too deep here, if you are using a Mac for email, web browsing and other simple apps, there is probably no need for you to jump ship. In fact, if you are only using your Mac for those simple apps and photo editing, the MacBook Pro or the iMac Pro are all you need. Up until three months ago, I had actually been using my trash can Mac Pro (circa 2013) as my main photo editing workstation and never had to wait for any Photoshop tasks (and I routinely work on mutli-gigabyte layered files). In addition to not needing the new Mac Pro, building a Windows workstation really will not be beneficial to you. Most photo editing apps like Photoshop and Lightroom can’t/won’t even use more than 8 processor cores.
The new Mac Pro is really geared for video editing and 3D/CGI work. And for those types of work, you want a lot of horsepower (CPU cores) and graphics power. To spec the fastest new Mac Pro will set you back about $18,000 (see below pic for specifics). This spec includes a 28 core processor, 96GB of RAM, a pretty good but not the best offering video card and a 2TB SSD for your system and apps. You could add the Afterburner card for another $2,000 but all that does is read ProRes files faster. Afterburner does not encode ProRes or even help read any other codecs like RED or Arri. This price does not include monitors or a RAID or SSD for your working files.
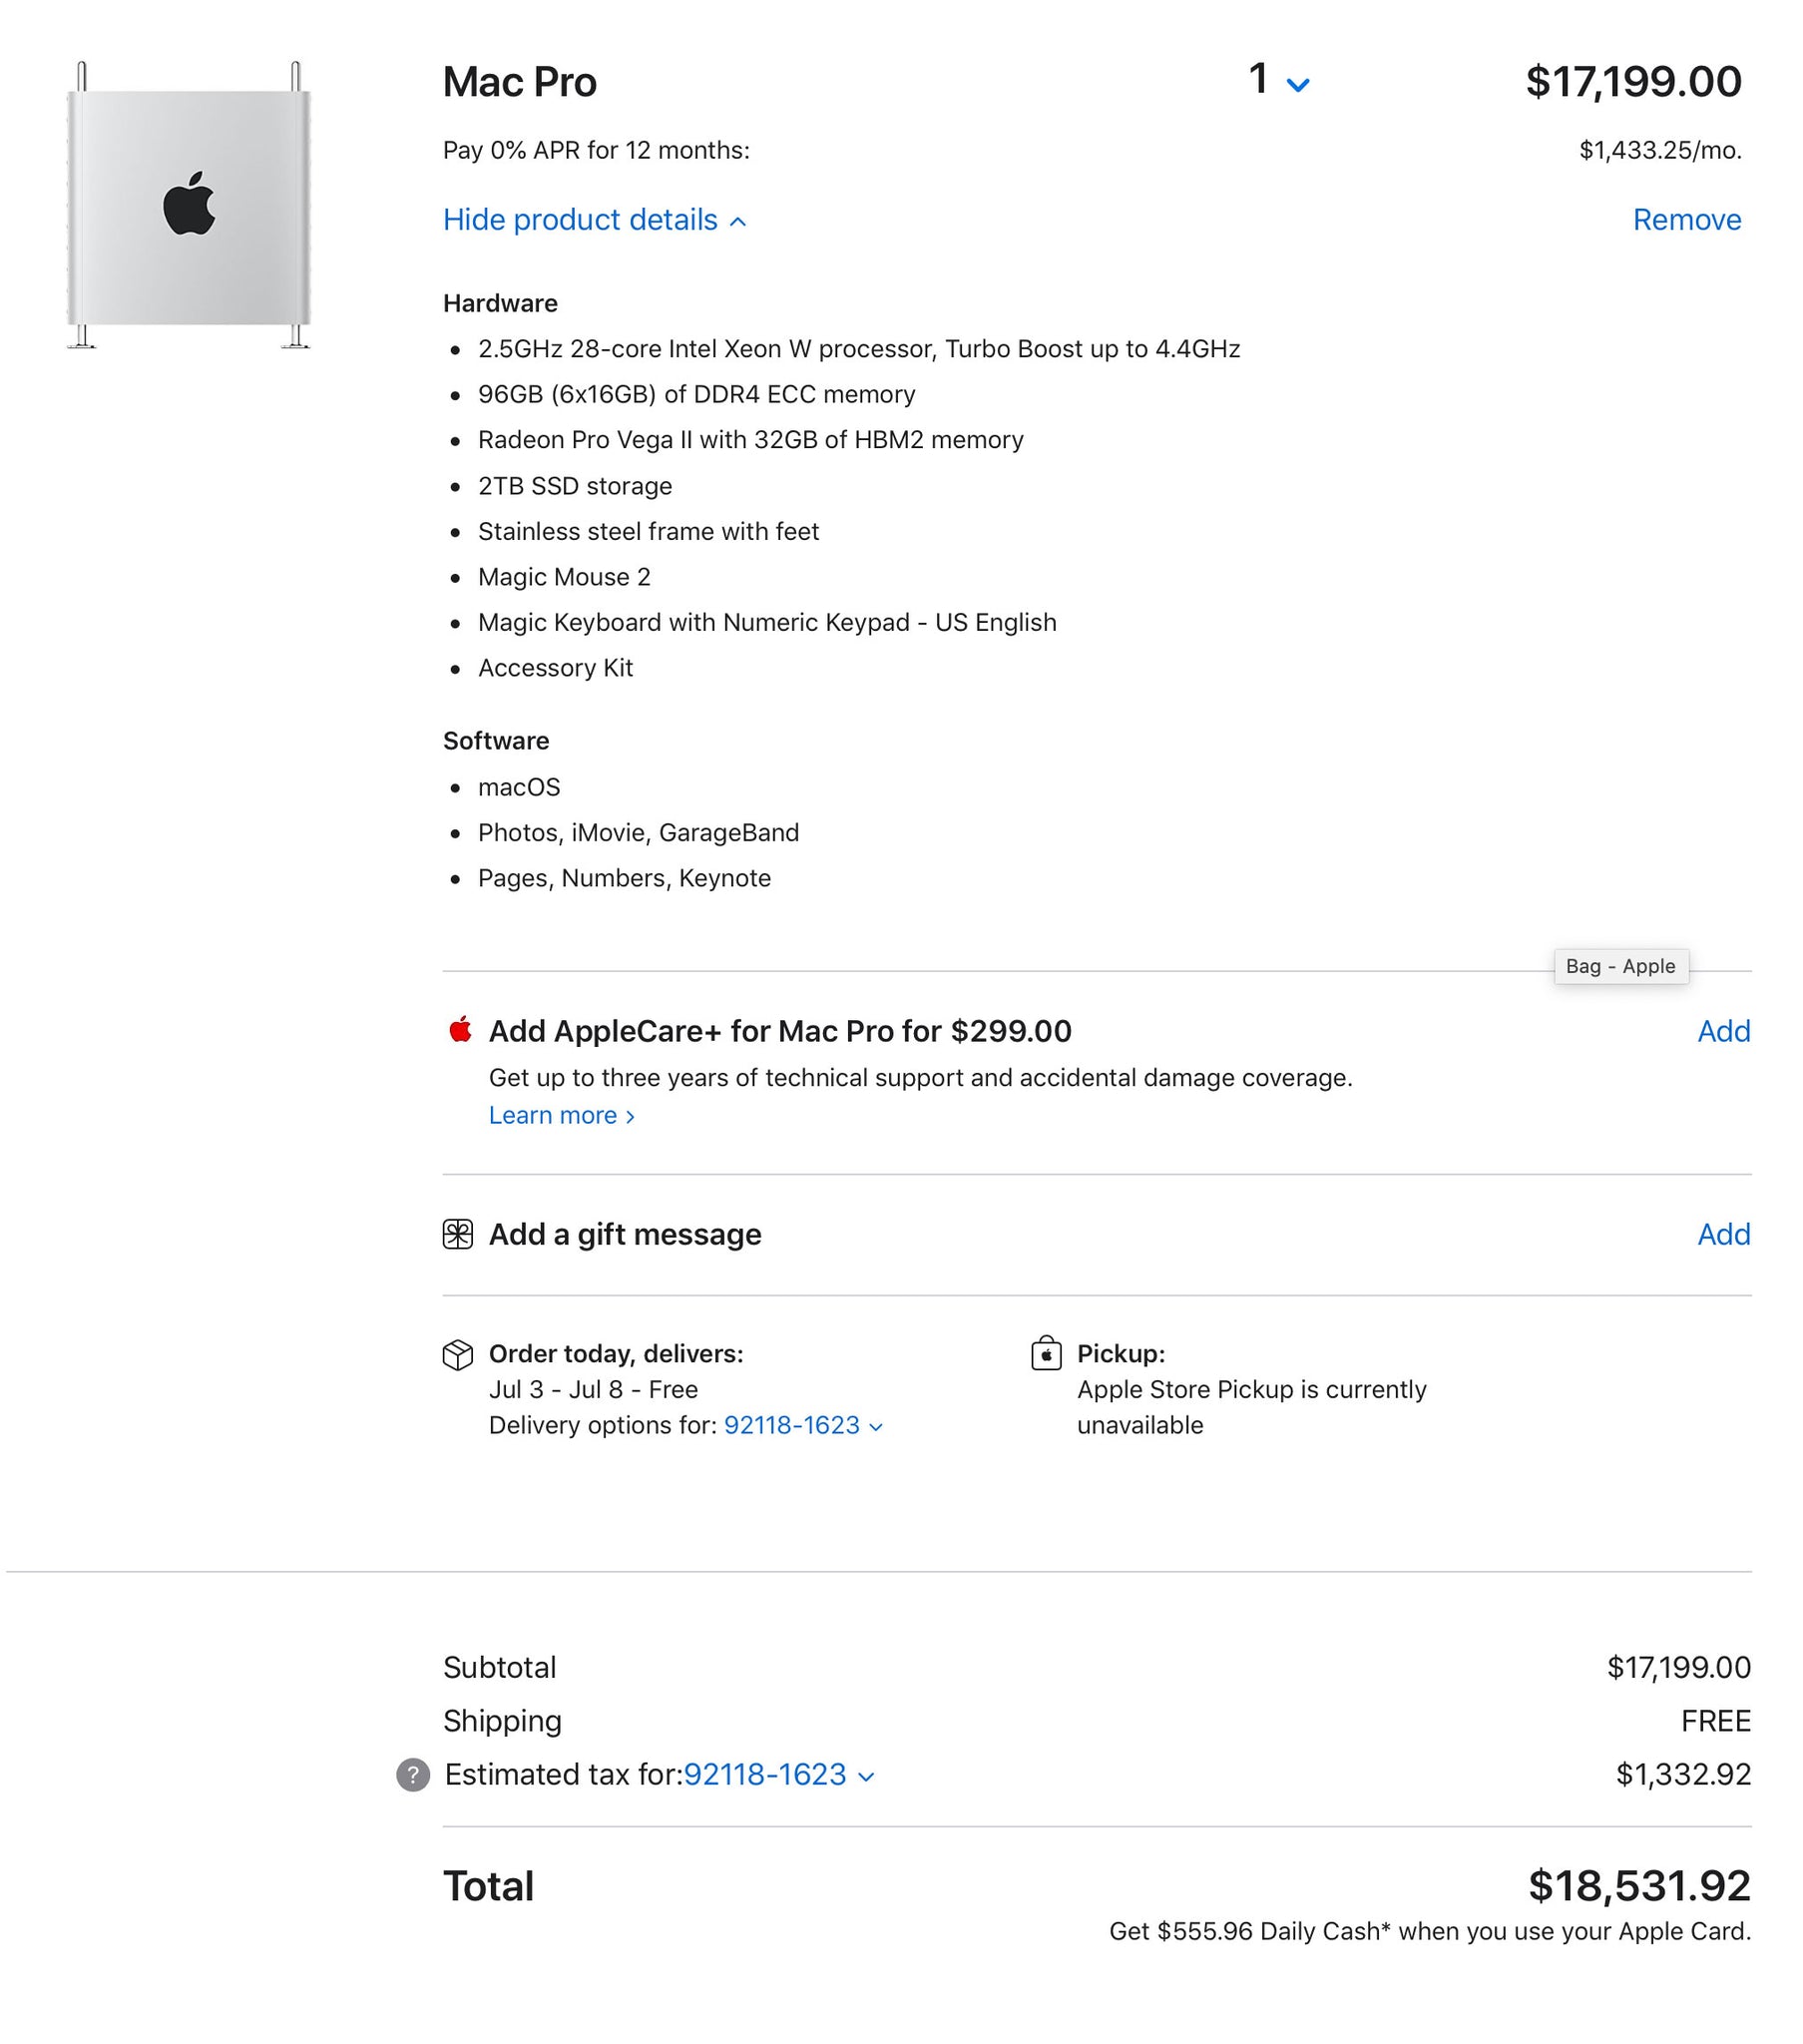
Okay, $18,000 is a lot of money but you are getting the fastest Mac ever made. And, like I said, I am a true Apple fan and love everything Apple but I cannot justify buying one. If you live in the Apple bubble, you may not know that for a fraction of the cost there are 32 and 64 core processors out there that will trounce the Xeon W processors that Apple uses. Also, Apple for some reason does not like Nvidia. Nvidia actually makes the fastest and best graphics cards out there—that is a generally agreed upon fact among gamers and CGI artists. So there is zero compatibility with MacOS and Nvidia—you cannot use them together at all. Here is the kicker—the Windows workstation that I built that is more powerful than this $18,000 Mac Pro and only cost me $5,000. WTF?
Here are the specs on the Windows workstation I built and have been using for the past three months:
- AMD Threadripper 3970x 3.7GHz 32-Core (64 threads) Processor
Latest price: Amazon or B&H - Corsair iCUE H150i RGB PRO XT 75 CFM Liquid CPU Cooler
Latest price: Amazon - Gigabyte TRX40 AORUS MASTER EATX sTRX4 Motherboard
Latest price: Amazon or B&H - G.Skill Trident Z Neo 64 GB (4 x 16 GB) DDR4-3600 CL16 Memory
Latest price: Amazon - Samsung 970 EVO Plus 2 TB M.2-2280 NVME Solid State Drive
Latest price: Amazon or B&H - NVIDIA GeForce RTX 2080 Ti 11 GB Video Card
Latest price: Amazon - Thermaltake Level 20 HT Snow Edition ATX Full Tower Case
Latest price: Amazon - Corsair HX Platinum 1200W 80+ Platinum Power Supply
Latest price: Amazon
And, when I say “build”, it is far from the image you probably have in your head of me soldering microchips on a motherboard while Telsa coils are arcing and buzzing in the background. “Building” a Windows machine is merely assembling a few parts together just like putting together a cinema camera before a shoot. Everything is plug and play and you can literally put a Windows machine together in 15 minutes.
I only use this Windows workstation back in my studio and it is only used for image editing, video editing and 3D rendering. It is basically my editing and rendering “tool”. In Adobe Premiere, I can play 8K RED RAW footage with no proxy in real time with no stutter. My 3D rendering software (Keyshot) shows me photorealistic rendered models as I change camera angles and model materials nearly instantaneously.
Many people are under the assumption/myth that processor speed does not matter anymore because you can just add a faster or second GPU and everything is fine. This is untrue for two reasons. One, many tasks in photo and video editing and 3D still rely on the processor. A fast GPU can help with certain tasks but it is not the silver bullet that many think it is. Second, many 3D programs render things differently with the CPU than the GPU. Usually, the CPU render is more accurate and preferred.
Going back to the Apple and Nvidia incompatibility is also a huge issue and also big factor in me going down this road. Nvidia has a technology called RTX and many 3D apps only use RTX. Those apps either do not work with a Mac or are severely hindered without RTX. When I run Keyshot on my MacBook Pro, I have no GPU support and it relies solely on the CPU. Only 8 cores on a CPU for realtime 3D previews is far from ideal—it is actually very frustrating.
One huge advantage on the Windows machine side is compatibility, availability and upgradability of parts and components. Right now, in June 2020, the Aorus Master motherboard I chose is PCIe 4 whereas the latest and greatest Mac Pro motherboard is only PCIe 3. PCIe is Peripheral Component Interconnect Express—basically the highway which all the parts inside the machine can communicate with each other. PCIe 4 is twice as fast as PCIe 3. So, the brand new Mac Pro is already stuck with old technology. With Windows, you can upgrade the mother board for a few hundred dollars and you have the latest and greatest. That will never happen on the Mac Pro. USB 4.0 will be here later this year but that $18,000 Mac Pro will be stuck with USB 3.2 for the rest of eternity but a Windows machine can be upgraded to whatever the latest tech is. Apple will never make and sell you just an upgraded motherboard.
I bought a 32 core processor that is capable of 64 threads and since then a 64 core processor that is capable of 128 threads has been released. I can literally buy the new processor, pull a lever on my motherboard and swap out the old with the new. That would be a hefty $3,500 upgrade but then remember that Apple charges $7,000 for their fastest CPU upgrade which is currently only 28 cores—less cores than my current 32 core processor that only cost me $2,000.
When it comes to benchmarks, there is an app called Geekbench. Geekbench will give your computer a score for its raw computing power. It is not a real-world test but it it is an indication that when you step on the gas, you will burn x amount of rubber. My fully loaded MacBook Pro 16” scores a 6923 multi-core score and it is a very capable machine. The fastest multi-core score I could find for a 28-core Mac Pro was 20,546. So, about three times the performance for about four times the price—not too bad. The Windows workstation I built with the 32 core Threadripper scored a multi-core score of 25,907. The first 30 pages of results on Geekbench’s CPU test ranking web site are almost all AMD Threadripper processors. You will not find an Intel Xeon-W processor in a new Mac Pro until about page 50. Again, not a true test of computing braun but a pretty good raw indication of what you are dealing with.

I would be deceptive, if I did not tell you about my growing pains of learning to use this new tool. It is kind of like switching from Canon to Nikon. For starters, the Command and Control keys on the Mac are substituted with Alt and Control keys on Windows. Further more, they are in opposite locations than what my muscle memory has learned for the last 30 years. To start, this was very frustrating and then to go back to my Mac keyboard was equally as frustrating. But then I found a utility called Key Remapper that remapped my Windows keyboard to match the Mac keyboard. Crisis averted.
Also, there is no Option key in Windows but rather you use a right-click on the mouse to equal the Option key of the Mac. I have actually adopted it rather quickly and have found that the Mac actually has the same function and now I use it a lot when I am on my Mac. Windows does not natively like Mac formatted hard drives. But an extension called HFS+ for Windows by Paragon fixed that. FYI, screen capture is Windows Key + Shift + S. So little things like this take getting used to and occasionally I have to hit up Google. It is kind of like looking for the windshield wiper switch in the BMW versus the Mercedes—eventually you figure it out and get used to it.
When it comes to equipment for work, I am not one to shy away from paying top dollar for the right tools. We always have the latest cameras and equipment to get the job done. But when it came to this tool that I was going to use to edit my work with, I was a little suspicious of the $18,000 price tag. I am in the Apple ecosphere so I completely understand the premium we pay to have beautiful looking products but $18,000 for a workstation is a bold proposition. When I did some poking around and came up with a price tag of $5,000 for a faster and better tool, I was extremely skeptical. But I decided to do the experiment and worst case scenario it would all go on eBay and I would end up buying the new Mac Pro. So far, three months in, the new tool is performing incredibly. Maybe I will have a change of heart in six months but so far there have not been any deal breakers.
It is understandable if you do not want to learn a new tool and want to stick with what you already know and love. If you order the new Mac Pro, save yourself a lot of cash by only buying the base model machine from Apple. You can order the larger CPUs online ($4,500 from PC Nation vs. $7,000 from Apple for the 28 core) and pop that in yourself. Also, the same for the RAM and SSD (Apple charges about double for SSDs). The Apple RAM price is a joke. You can actually spec a $50,000 Mac Pro from Apple if you max out the RAM. If you buy the RAM aftermarket ($649 from OWC vs. $1,000 from Apple for 96GB), you will save yourself hundreds of dollars and even thousands once you start buying larger RAM configurations (192GB: $1,200 vs. $3,000, 768GB: $3,600 vs $10,000). The CPUs, RAM and SSDs all come from the same places whether you buy them from Apple or another vendor and for the most part are commodities. Whatever you do, do not buy the base model 8 core new Mac Pro (Geekbench score 8032) and use it like that as it barely outperforms the 16” MacBook Pro and underperforms the 8 core iMac Pro (Geekbench score 8059 and the iMac includes a Retina display) unless for some reason you needed a bunch of PCIe slots.
Another factor in this experiment is I like to tinker with stuff and figure out how stuff works. I am a true nerd. I also get that a lot of people do not care for that stuff. But if you still wanted to save $10,000+ you could have someone build a Windows workstation for you. I have never used them but a lot of people have good things to say about Puget Systems. You tell them what you want and they will build it, configure it and test it. I think their fee works out to be about $1,000 for a custom build like this which is still totally worth it.
I leave you with a few photos and descriptions of the workstation that I built:
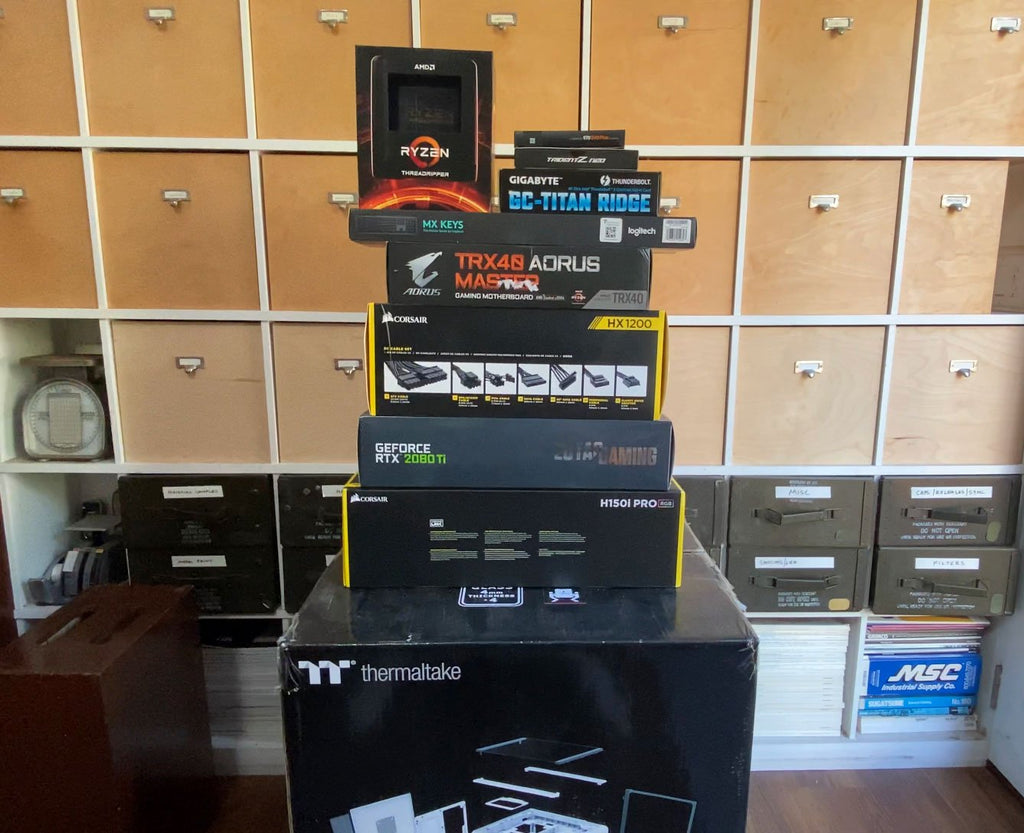 Here is everything I listed above in my Windows workstation build. As you can see, it is really not a whole lot of stuff and really is super easy to put together.
 Here is the full build installed in the cabinet that it lives in. I chose this Thermaltake Level 20 HT Snow Edition case because it has a good reputation for cooling and is very expandable. It is a very large case that measure about 18x20x24" and is pretty much the size of a mini fridge. Because of its size and the fact that the glass panels are easily removed from four of the sides, this case is very easy to work on. You can set up the cooling however you like as there are multiple grilles to pull or push air in or out of the case. I currently have the main air intake of the bottom front half of the case where it is first passes through the radiator for the liquid cooling for the CPU. Then, there is a second intake on the rear bottom that pullls air in and passes it over my power supply.. Then on the rear panel there are more fans the expel all the warm out. I actually have cut a hole in my office wall that mates up to that expended warm air and dumps it outside.
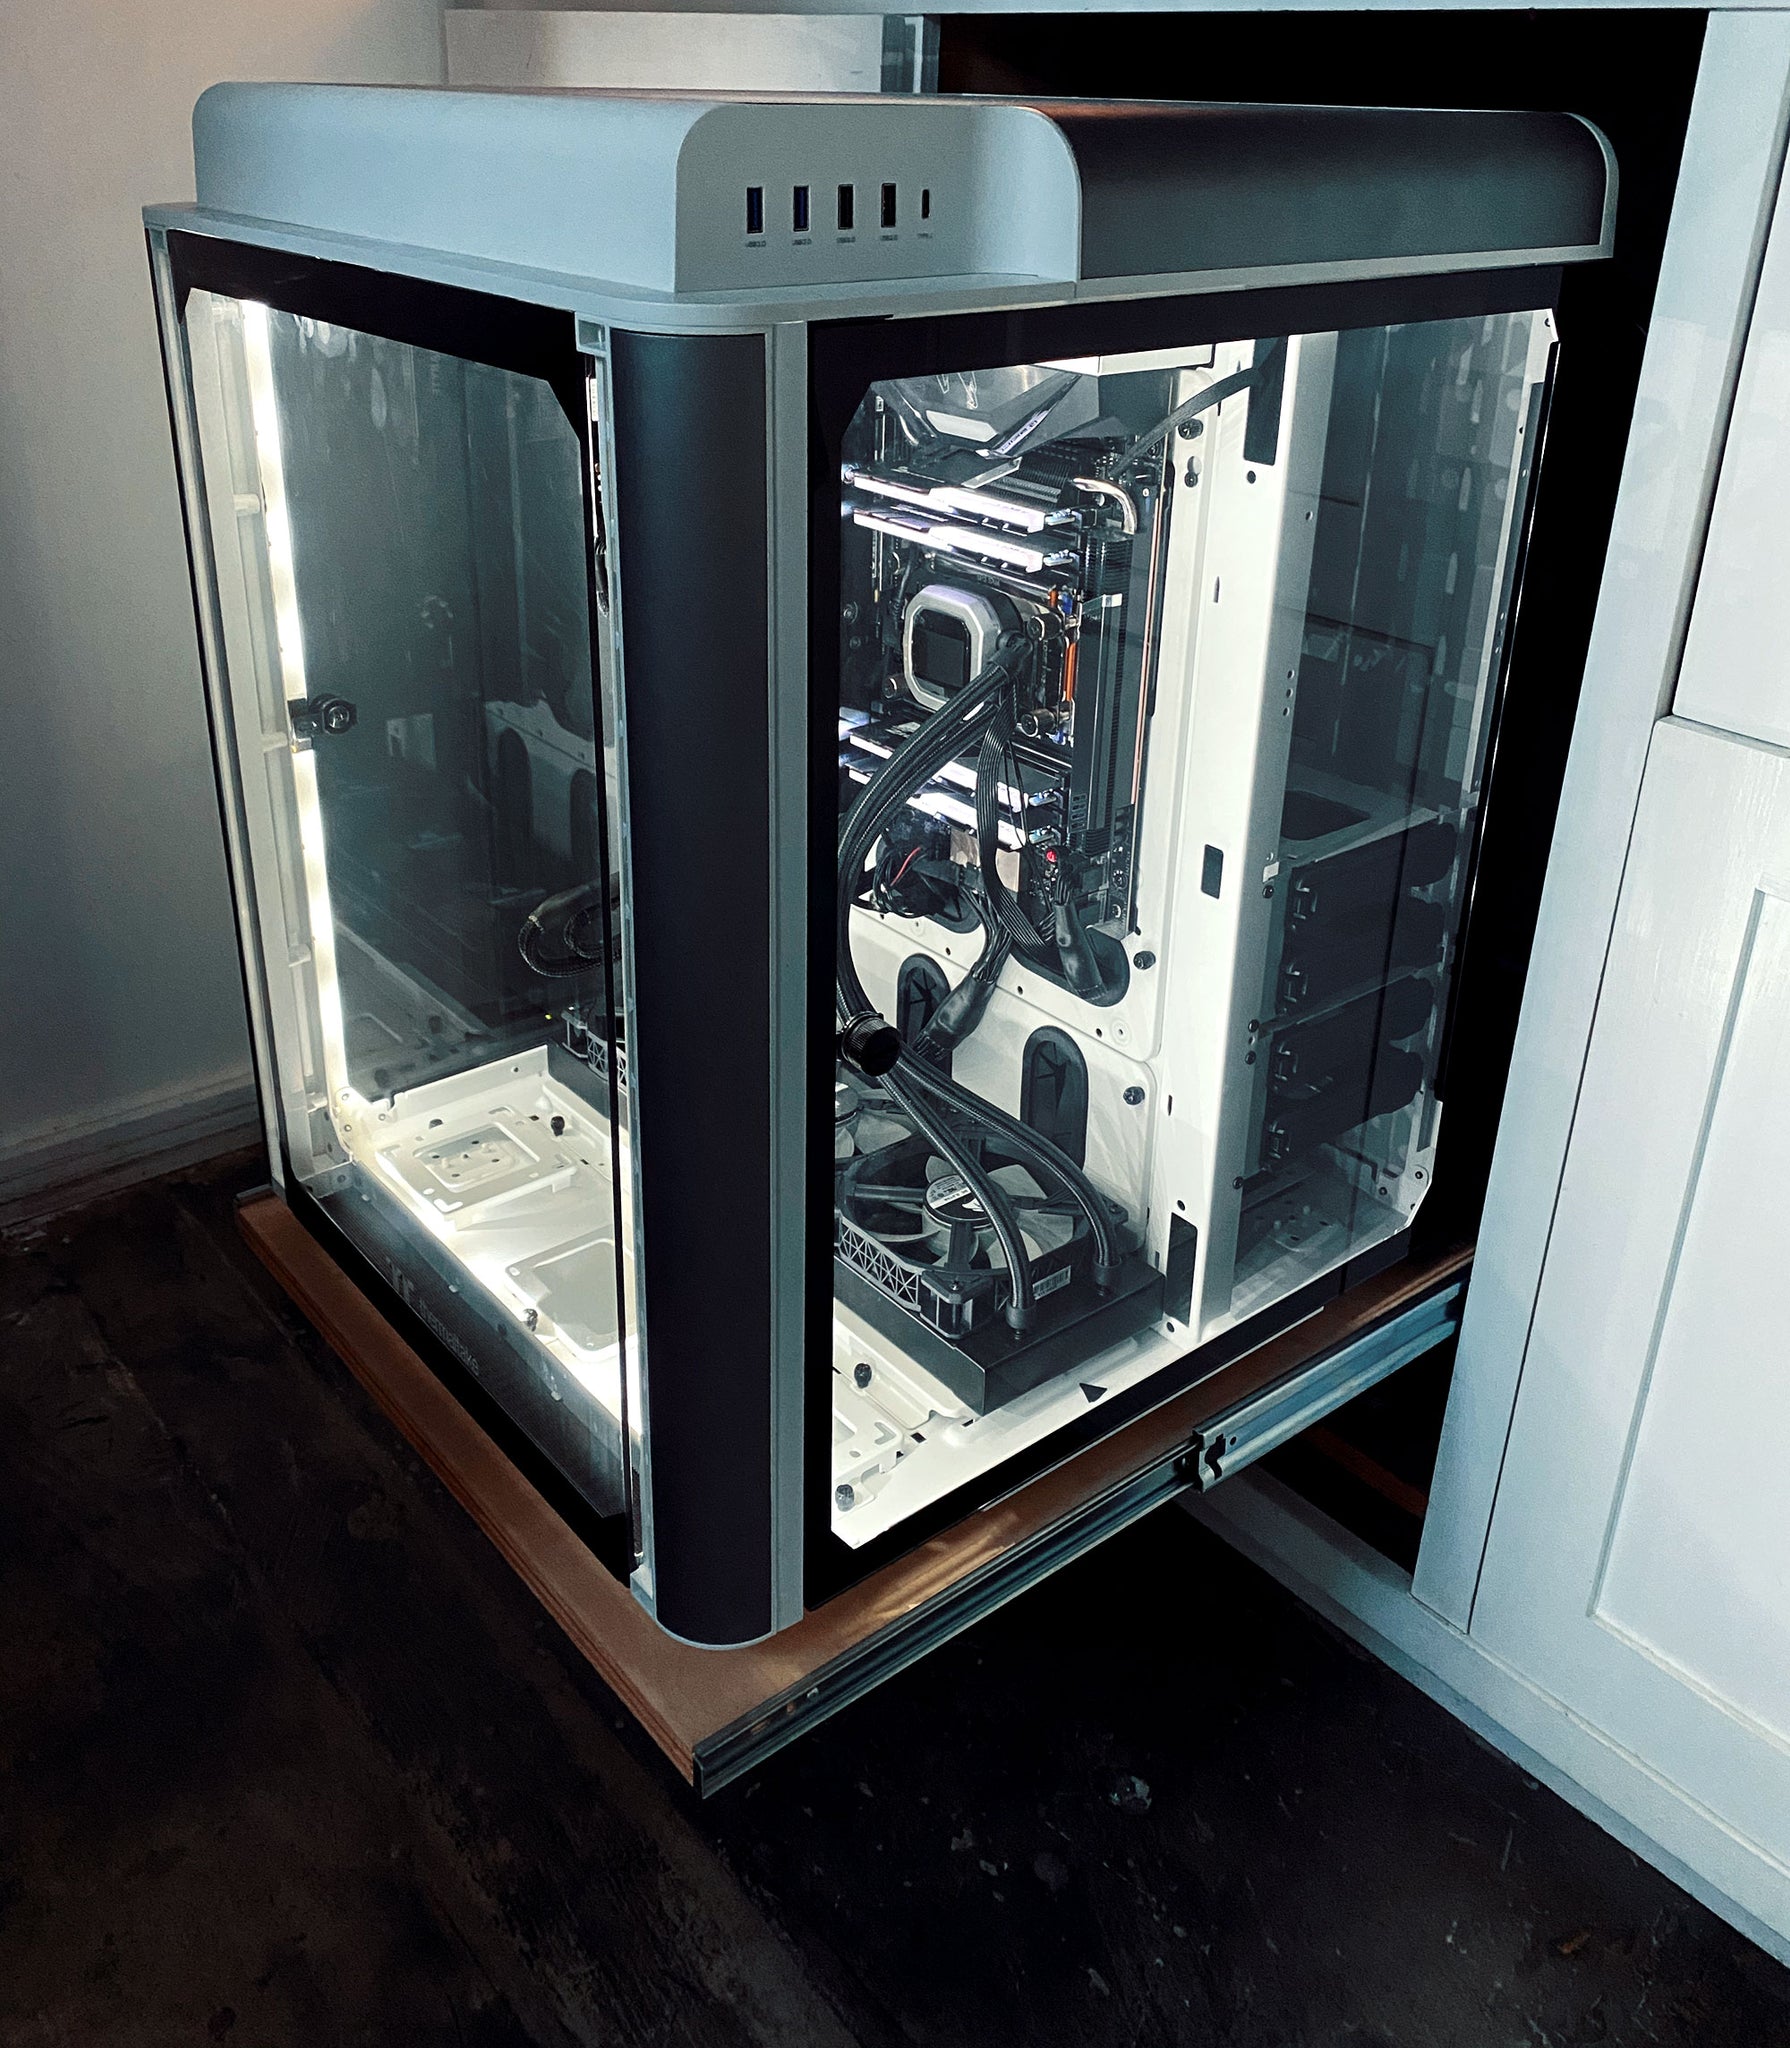 Here is a 3/4 view of the workstation extended from the cabinet. You can see that the front and rear are divided. The front section gets all the pretty computer components while the rear hides all the wires, power supply and hard drives. This case can hold eight 3.5" hard drives, two 2.5" SSDs and three NVME m2. SSDs. You can also use the divider to manipulate air flow.
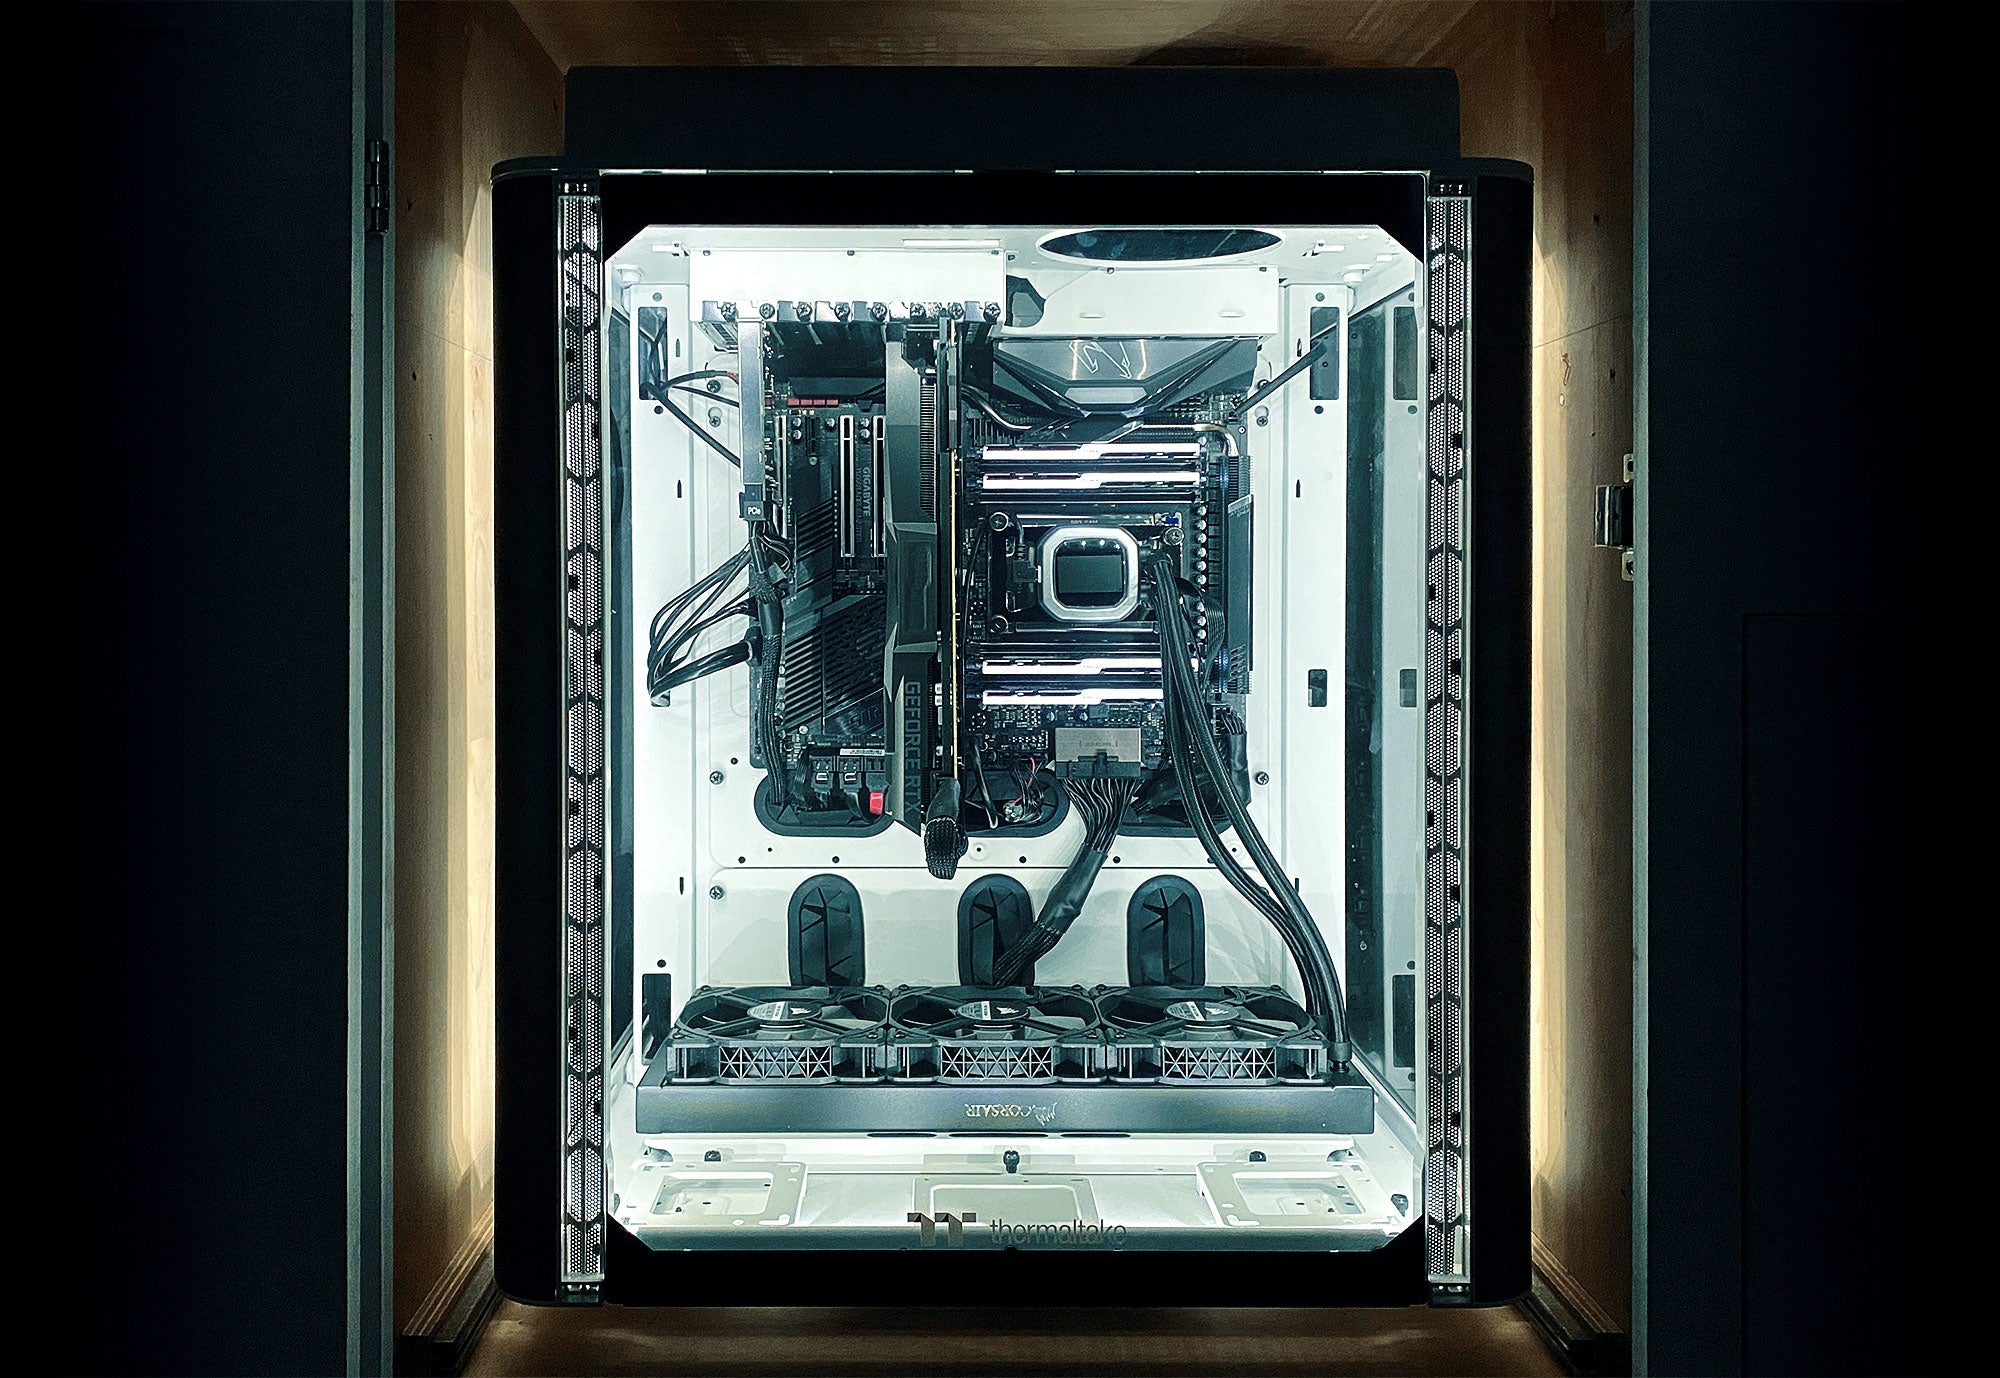
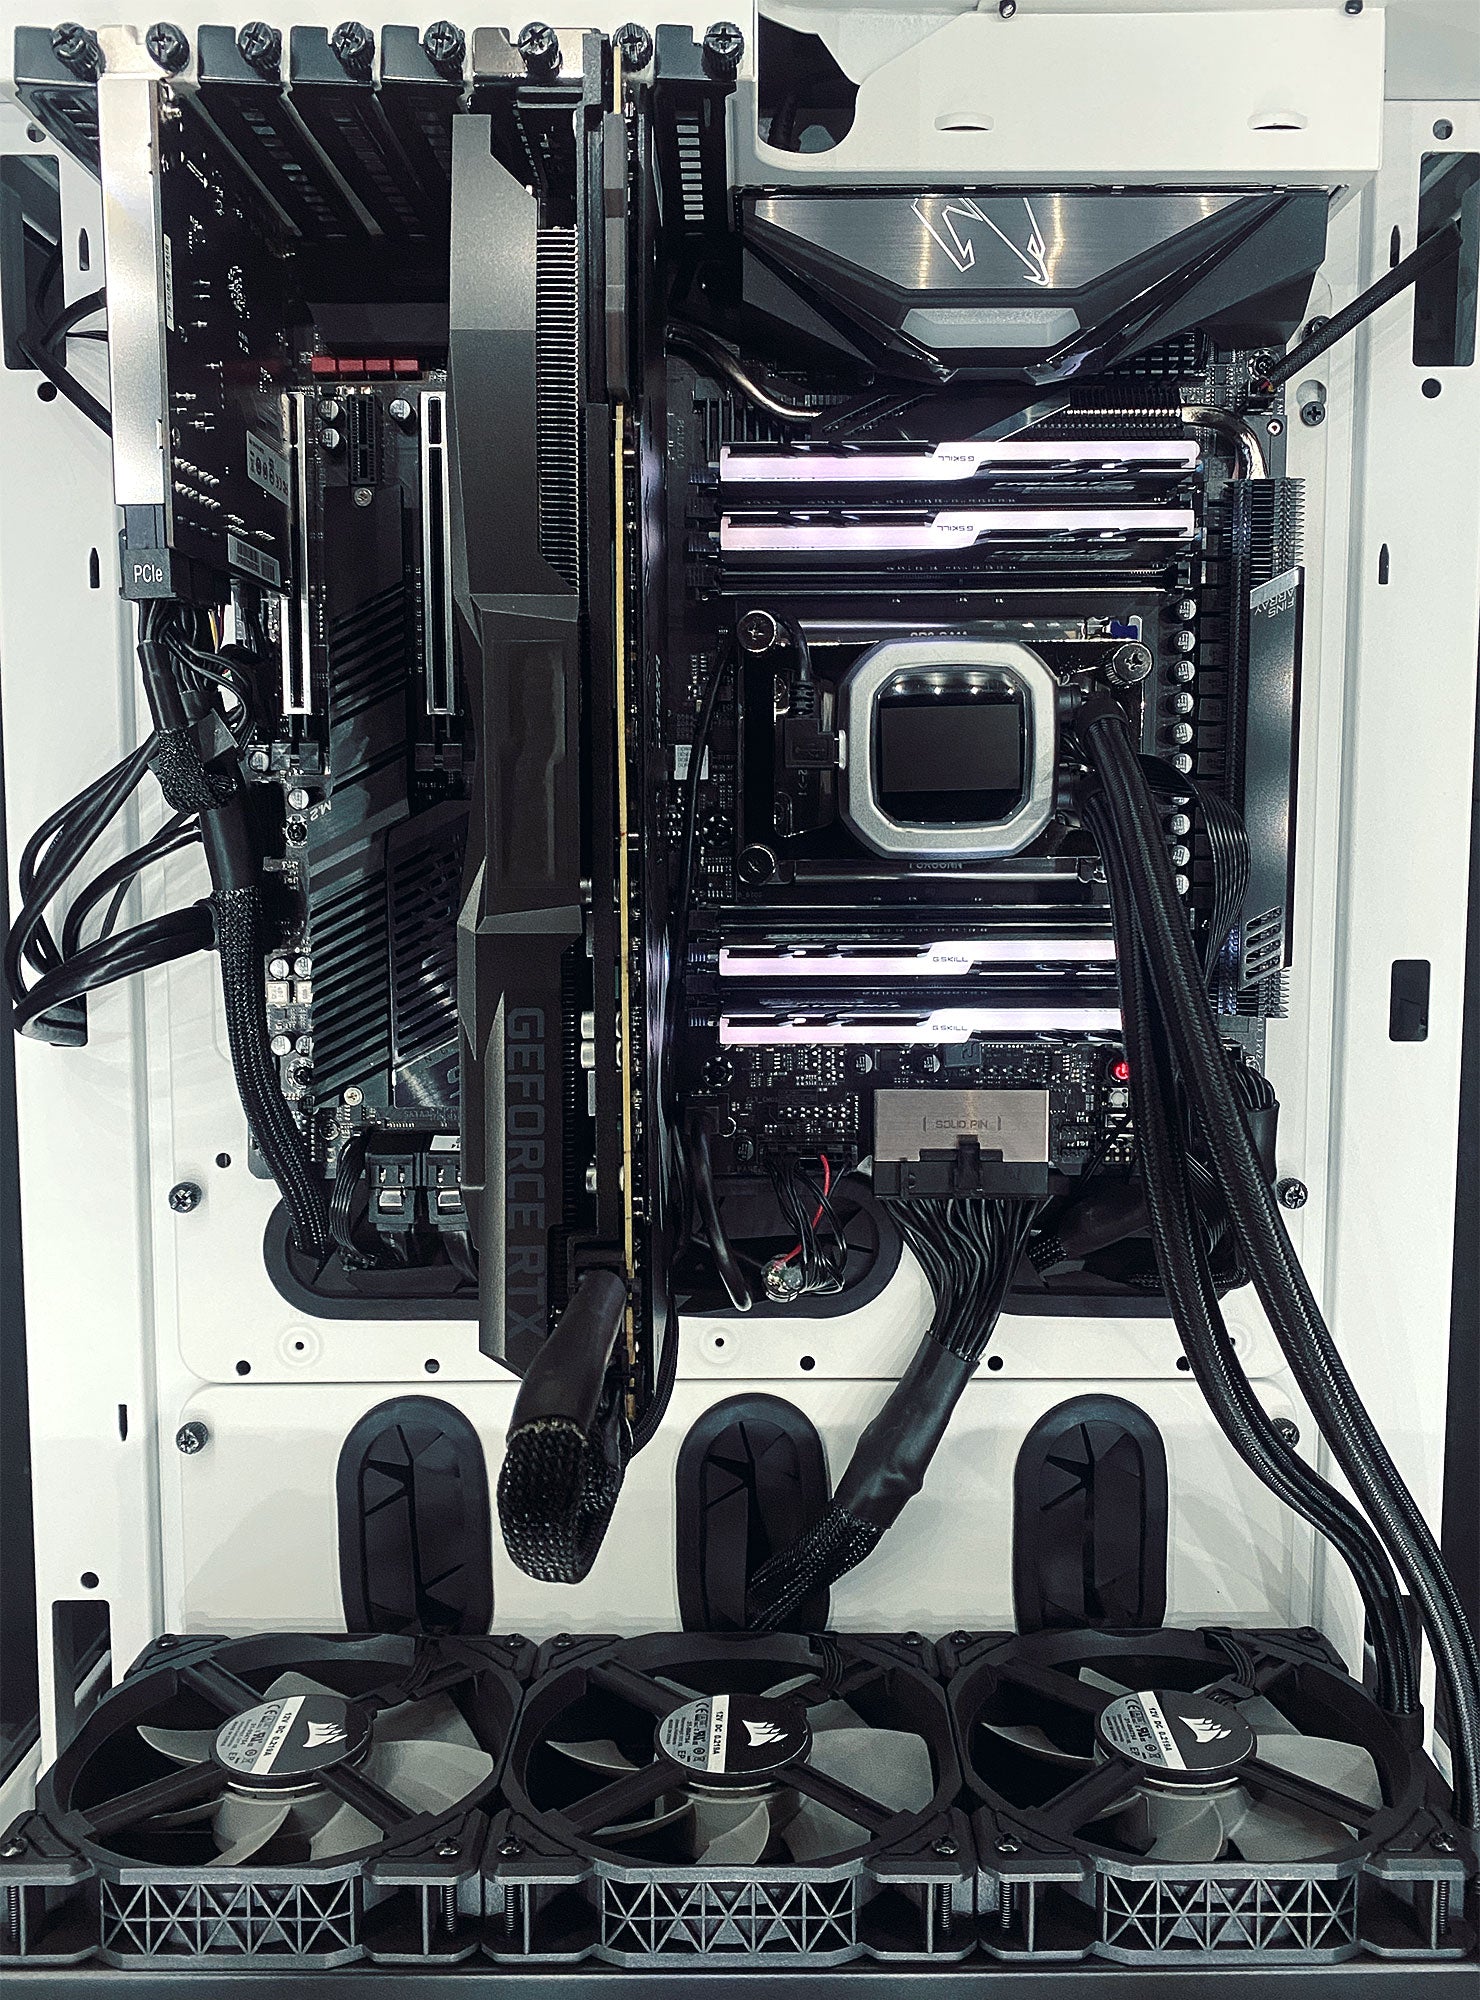 Here is a closer look at all the components. I chose the Aorus Master motherboard because it is one of the few motherboards that support Thunderbolt 3. Thunderbolt is not as entrenched in the PC world as much as the Mac world. Which is actually fine because it is kind of a dying technology and USB4 will the same speed as Thunderbolt 4. I made sure to include Thunderbolt 3 with this build because I still have a lot of Thunderbolt drives including my main working drive which is a 32TB RAID 10 drive. Moving forward, I will probably start to use USB more. The three fans on the bottom pull the air over the radiator for the liquid cooling which you can see the two hoses on the right go up and right into the cooling block on the CPU. The air then goes up and over the dividing wall and then in to the back of the case where it is expelled out the back.
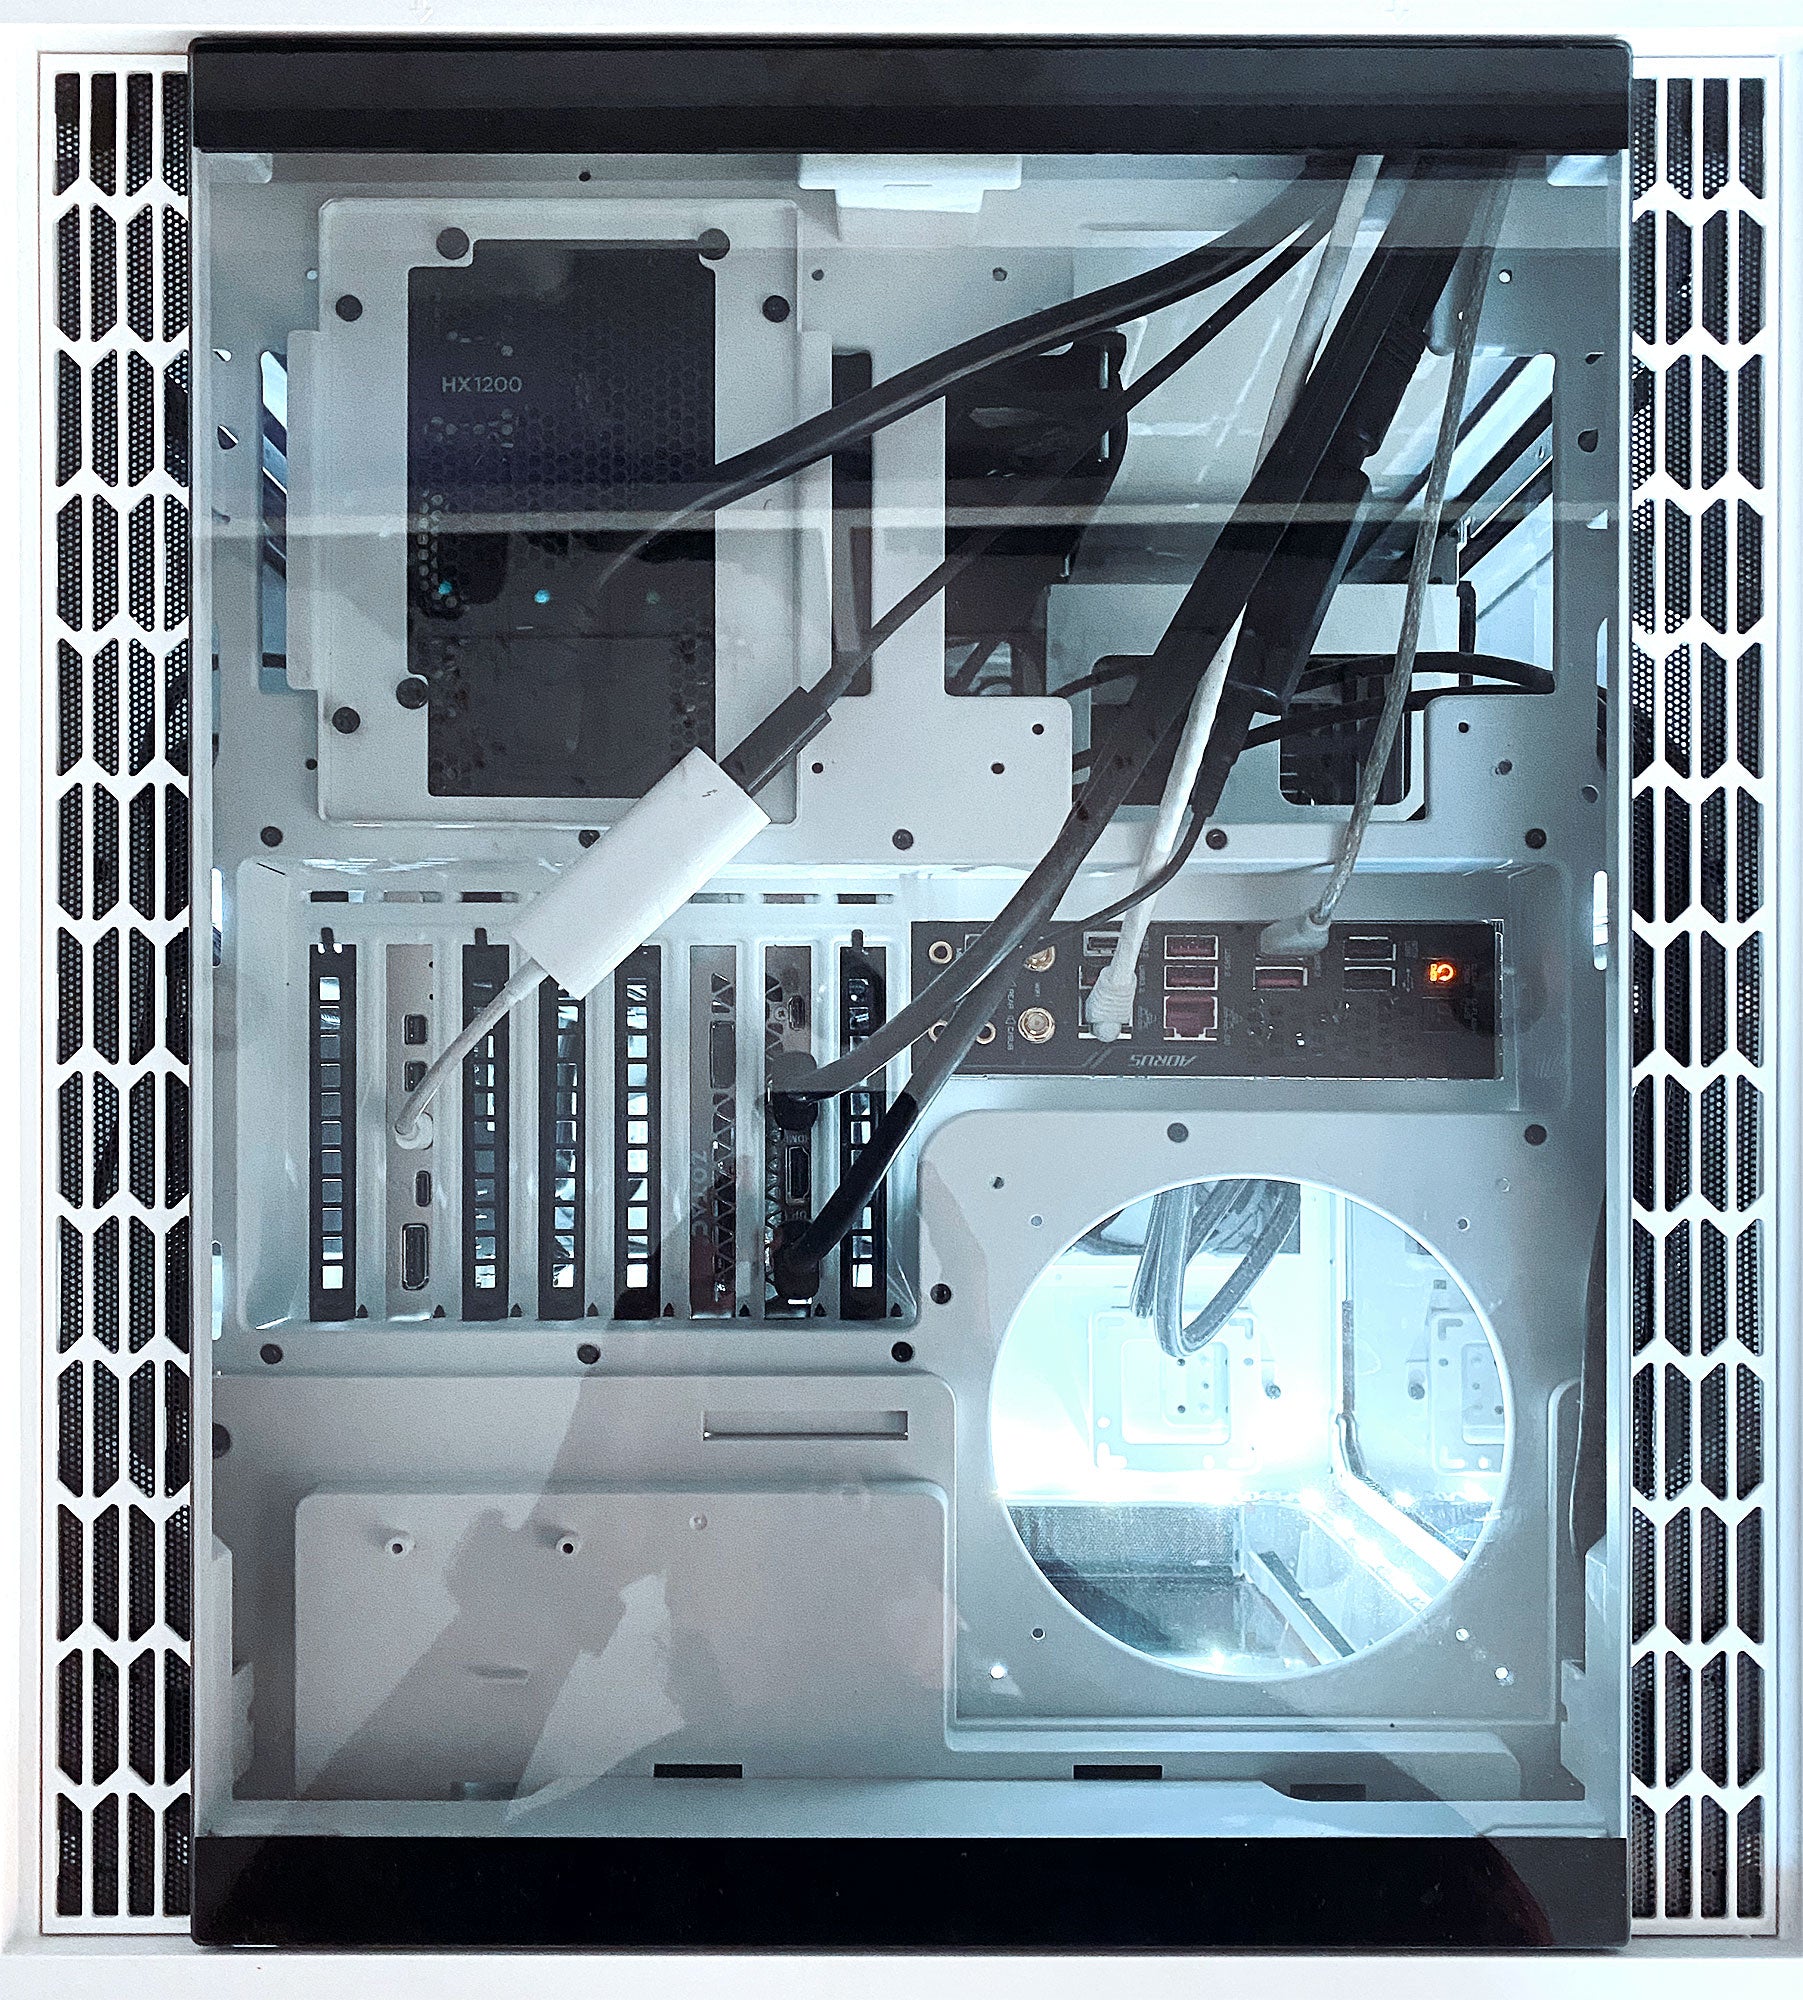 All the connections are on the top side and under glass. The cables still route out the back. As you can see, there is room for tons of expansion with this Thermaltake Level 20 HT case. I would say that I am probably only using about 25% of the total capacity.